
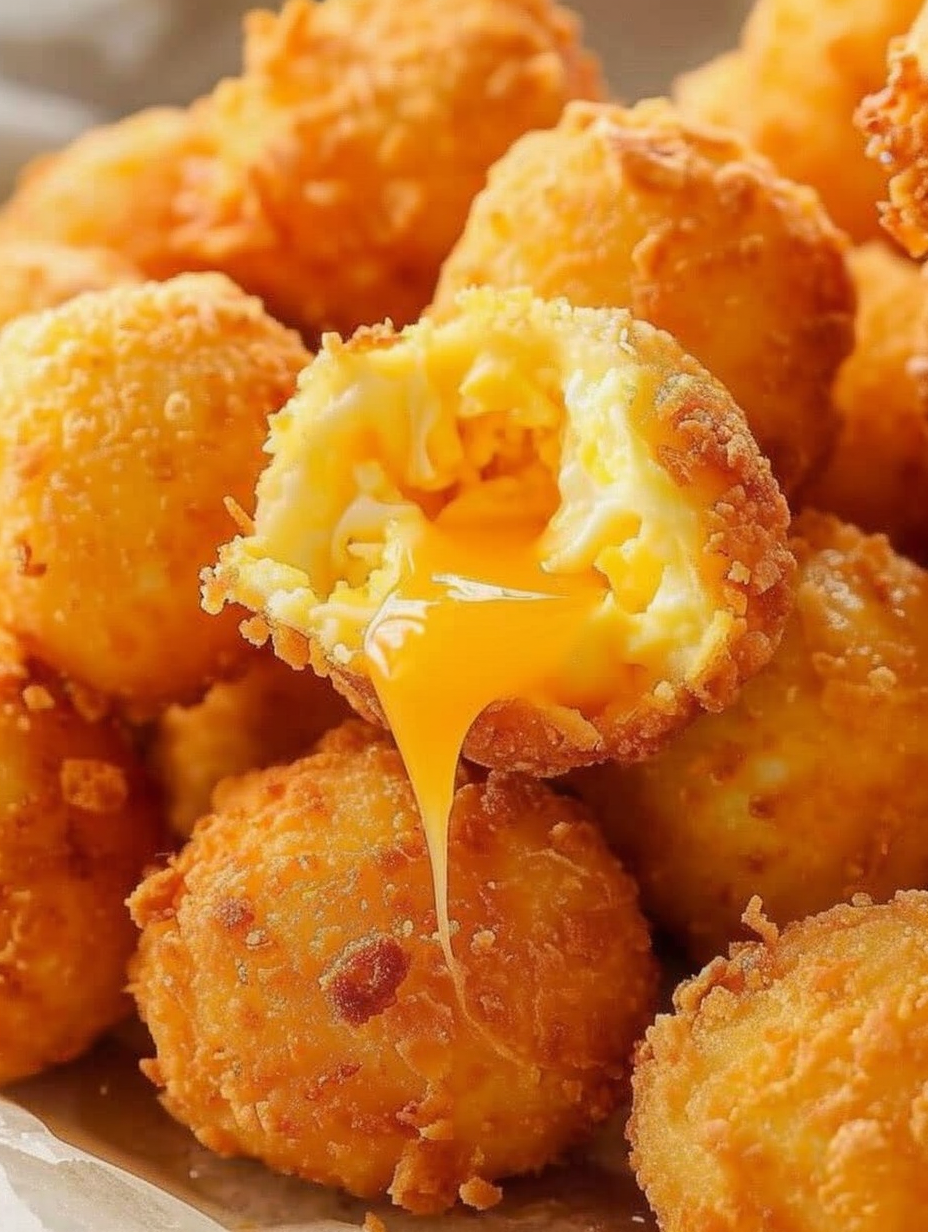
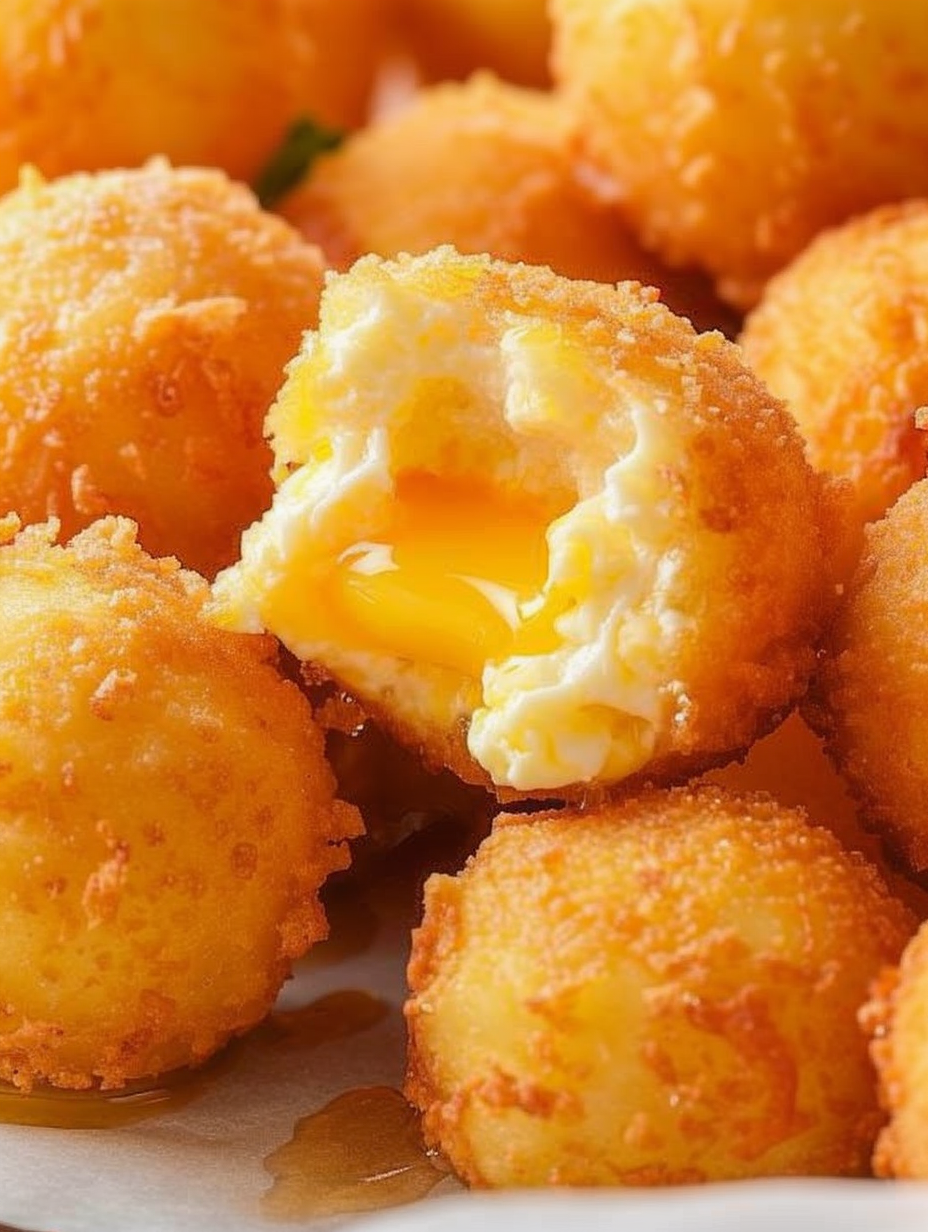
Crispy Fried Cheese Balls

Ultra-light, airy fried cheese balls made with just egg whites and sharp cheddar — a 3-ingredient party favorite that's crispy outside and gooey inside.
Why You'll Love This Recipe
- Ready fast: active preparation takes about 15 minutes and a quick 1–1½ minutes of frying per batch; chilling time is passive and flexible.
- Only three ingredients: egg whites, grated cheddar, and oil make this ideal when pantry options are limited.
- Party-friendly: each piece is bite-sized and sharable; the light interior makes them feel special despite the simple ingredients.
- Customizable: swap the cheddar for pepper jack, gouda, or a blend for smoky or spicy variations that please different palates.
- Make-ahead friendly: you can form and chill the balls up to a day in advance to save time on the day of serving.
- Low in carbs: with virtually no carbohydrate content, they work well for low-carb eating plans.
I remember watching the first plate disappear as my niece declared them the best snack ever. My husband, who's picky about texture, couldn’t resist going back for a second, which told me the balance of crisp exterior and molten interior was exactly right. Over time I've learned to keep the oil temperature steady and to chill the shaped mounds so they hold their airy shape during frying.
Ingredients
- Egg whites (2 large): Use room-temperature whites for better volume when whipping. If you separate eggs ahead of time, bring the whites to room temperature for 10–15 minutes before beating. I prefer fresh eggs for the cleanest flavor.
- Medium cheddar cheese (5 ounces, about 1 1/4 cups grated): Grate from a block for best melting and texture. Sharp cheddar works beautifully for bold flavor; mild cheddar will produce a subtler taste. Brands like Cabot or Tillamook melt reliably and have good salt balance.
- Vegetable oil for frying: A neutral high-heat oil such as canola, sunflower, or classic vegetable oil. Plan for enough to create a 3–4 inch deep pool in a heavy Dutch oven so you can roll the balls as they fry.
Instructions
Whip the egg whites: Using a standing mixer with the whisk attachment or an electric hand mixer, beat the 2 large room-temperature egg whites until stiff peaks form. This takes about 3–5 minutes on medium-high speed. Look for glossy, white peaks that hold their shape when you lift the whisk. Overbeating will dry them out, so stop once the peaks are firm but still slightly glossy. Fold in the cheese: Gently fold the grated cheddar into the whipped whites with a spatula. Use a gentle motion from the bottom up to keep the mixture airy. The goal is a cohesive, slightly sticky mixture that still has air trapped inside; this air is what makes the exterior puff and crisp during frying. Portion and chill: Use a small cookie scoop (I use a 1 1/2 tablespoon size) to portion mounds onto a parchment-lined baking sheet. Chill in the refrigerator for at least 30 minutes; this firms the mixture and helps the balls hold shape when they hit hot oil. Heat the oil: Pour oil into a heavy Dutch oven to a depth of about 3–4 inches and heat to 350°F. Use a thermometer to maintain between 350°F and 375°F while frying. A consistent temperature ensures even browning and prevents the cheese from leaking out. Shape and fry: Gently roll each chilled mound into a loose ball — you want to retain the airiness, so do not compress tightly. Drop several at a time into the preheated oil, leaving space between them to avoid sticking. Fry for about 1 to 1 1/2 minutes, turning constantly with a slotted spoon to brown evenly. Aim for a deep golden color. Drain and serve: Remove fried balls with a slotted spoon and transfer to paper towels to drain excess oil. Serve immediately for the best gooey interior, or keep in a warm 200°F oven briefly while frying the remaining batches.
You Must Know
- These keep in the refrigerator for 2–3 days in an airtight container; reheat briefly in an air fryer or microwave, though the texture is best fresh.
- They are low in carbohydrates and high in fat, with approximately 169 calories each when using medium cheddar and frying in vegetable oil.
- Maintain oil temperature; if the oil is too cool, balls will absorb excess oil and may collapse; too hot and the exterior will burn before the interior melts.
- Use a deeper pot rather than a shallow pan to allow gentle turning so the balls brown evenly and keep their round shape.
My favorite part is how a few simple technical steps — whipping whites and chilling — transform ordinary cheese into an ethereal snack. Guests always comment on the texture, and I enjoy experimenting with different cheeses and occasional spice mixes folded into the grated cheese for variety.
Storage Tips
Store cooled cheese balls in a single layer in an airtight container in the refrigerator for up to 2–3 days. If stacking is necessary, separate layers with parchment to prevent sticking. For reheating, the air fryer at 350°F for 3–4 minutes refreshes the exterior and warms the interior without sogginess; a quick 15–20 second microwave burst will heat them but can soften the crispness. To freeze, freeze on a tray until solid, then transfer to a freezer bag for up to one month; reheat straight from frozen in a 350°F oven for 10–12 minutes until heated through.
Ingredient Substitutions
Swap medium cheddar with sharp or extra-sharp for a punchier flavor, or use smoked gouda for a deeper, savory note. Pepper jack adds heat and works well for game-day variations. If you prefer a creamier interior, grate a softer melting cheese like fontina but blend it with a firmer cheese to avoid too much oozing. For lower-fat versions, use a reduced-fat cheddar though the texture may be slightly less rich. Because the structure relies on beaten whites, omitting them is not recommended.
Serving Suggestions
Serve these on a warmed platter garnished with chopped chives or smoked paprika for color. Pair with tangy accompaniments such as a roasted garlic aioli, marinara sauce, or a simple dill-yogurt dip. They make a delightful addition to appetizer spreads at parties, or serve alongside a crisp salad for a contrast of textures. For brunch, offer them with sliced tomatoes and a peppery arugula salad.
Cultural Background
While bite-sized fried cheese appears in many cuisines, these airy cheese balls are a modern American twist on classic fried cheese traditions. The technique of incorporating whipped egg whites to create a light interior owes more to refined patisserie methods than to traditional savory frying, resulting in an unexpected combination of airy texture and melty cheese that feels both playful and indulgent on casual American tables.
Seasonal Adaptations
In colder months, use bold, aged cheeses and fold in a pinch of smoked paprika or finely chopped roasted jalapeño for warmth. In the summer, lighten the accompaniment with a bright herb salsa or lemony yogurt dip and pair with seasonal tomatoes. For holidays, serve cheese balls with cranberry-chive relish or a mustard-maple dip to echo festive flavors.
Meal Prep Tips
Make the cheese-and-white mixture in the morning, portion it into chilled mounds, and refrigerate until ready to fry that evening. Alternatively, shape and freeze the mounds on a tray; when firm, transfer to a bag and fry from frozen as needed. Keep a thermometer handy to monitor oil temperature while frying multiple batches; consistent heat produces consistent results and helps keep the balls uniformly puffed and golden.
This small, high-impact snack brings a lot of joy to gatherings and quiet nights alike. With just a handful of ingredients and a few technical steps, you can serve something that feels truly special — crispy, light, and irresistibly cheesy.
Pro Tips
Beat egg whites to stiff, glossy peaks but stop before they dry out to maintain moisture for folding.
Chill portioned mounds for at least 30 minutes to help them keep shape in hot oil.
Maintain oil temperature between 350°F and 375°F for even browning and minimal oil absorption.
Use freshly grated cheese from a block for best melting and texture; pre-shredded cheese contains anti-caking agents that change melt behavior.
Fry in small batches so pieces have room to roll and brown evenly without sticking.
This nourishing crispy fried cheese balls recipe is sure to be a staple in your kitchen. Enjoy every moist, high protein slice — it is perfect for breakfast or as a wholesome snack any time.
FAQs about Recipes
Can I prepare these ahead of time?
Yes. Prepare the cheese-and-white mounds and refrigerate for up to 24 hours before frying. Chilling helps them hold shape during frying.
What oil temperature is best?
Keep the oil at 350°F to 375°F. Too cool and they absorb oil; too hot and the outside over-browns before the interior melts.
How should I store leftovers?
Store in an airtight container in the refrigerator for 2–3 days. Reheat briefly in an air fryer to restore exterior crispness.
Tags
Crispy Fried Cheese Balls
This Crispy Fried Cheese Balls recipe makes perfectly juicy, tender, and flavorful steak every time! Serve with potatoes and a side salad for an unforgettable dinner in under 30 minutes.
Ingredients
Main
Instructions
Beat the egg whites
In a clean mixing bowl, beat 2 room-temperature egg whites with a stand mixer or electric hand mixer until stiff, glossy peaks form, about 3–5 minutes.
Fold in the cheese
Gently fold 5 ounces of freshly grated medium cheddar into the whipped whites using a spatula, maintaining as much air as possible for a light mixture.
Scoop and chill
Spoon the mixture using a 1 1/2 tablespoon cookie scoop onto a parchment-lined sheet, spacing mounds evenly, then refrigerate for at least 30 minutes to firm.
Heat the oil
Heat vegetable oil in a Dutch oven to 350°F, filling to a depth of about 3–4 inches. Use a thermometer to monitor and maintain 350°F–375°F during frying.
Shape and fry
Gently roll chilled mounds into loose balls, then fry several at a time without overcrowding for 1–1 1/2 minutes, turning constantly until deep golden.
Drain and serve
Transfer fried balls with a slotted spoon to paper towels to drain. Serve immediately for best molten center; keep warm in a 200°F oven if needed.
Last Step: Please leave a rating and comment letting us know how you liked this recipe! This helps our business to thrive and continue providing free, high-quality recipes for you.
Nutrition
Did You Make This?
Leave a comment & rating below or tag
@silksavor on social media!
Categories:
You might also like...

Parmesan Herb Crusted Salmon
Tender baked salmon crowned with a garlicky Parmesan herb crust, bright lemon, and buttery crunch. Simple to make, stunning to serve, and irresistibly flavorful.

Caramel Apple Cheesecake Bars
Buttery graham crust, silky cheesecake, and cinnamon-kissed apples under a crunchy crumb, finished with glossy caramel. A fall crowd-pleaser you will crave.

Homemade Green Bean Casserole
Tender green beans in silky mushroom cream, crowned with crispy onions. A comforting holiday side made entirely from scratch that always disappears fast.
Did You Make This?
Leave a comment & rating below or tag @silksavor on social media!
Rate This Recipe
Share This Recipe
Enjoyed this recipe? Share it with friends and family, and don't forget to leave a review!
Comments (1)
This recipe looks amazing! Can't wait to try it.
Comments are stored locally in your browser. Server comments are displayed alongside your local comments.

Hi, I'm Julia!
What's Popular

30-Minute Meals!
Join to receive our email series which contains a round-up of some of our quick and easy family favorite recipes.