
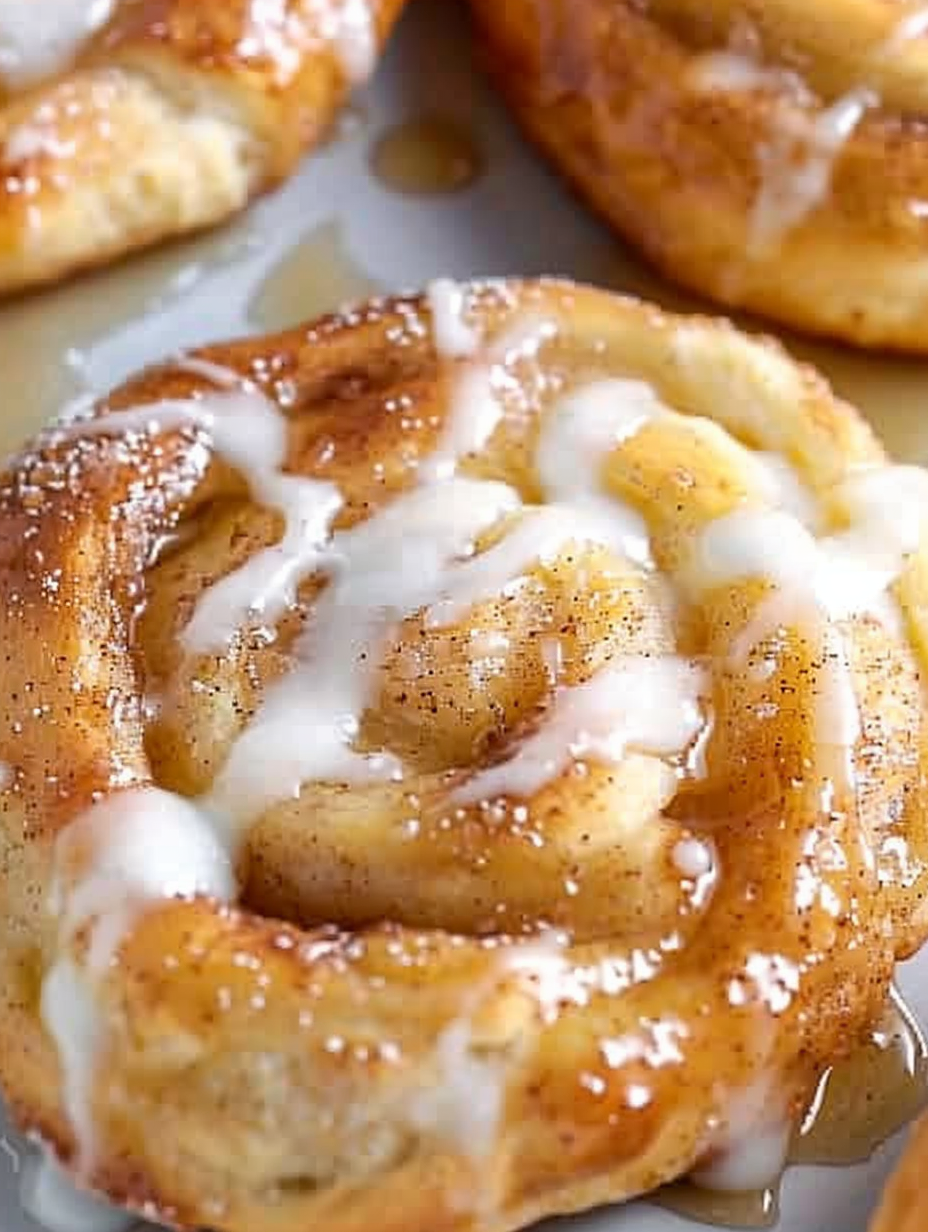
Easy Apple Danishes

Flaky crescent roll danishes topped with apple pie filling and a simple vanilla glaze — an effortless dessert or brunch treat ready in under 30 minutes.
This recipe for Easy Apple Danishes has been a quick favorite in my kitchen ever since I first made it on a busy weekend morning. I remember pulling the crescent dough from the fridge, uncanning a jar of apple pie filling, and thinking I could make something bakery-worthy without the long dough laminating process. What followed was a warm, buttery result: crisp outsides, soft inner layers, and pockets of spiced apple that made everyone at the table reach for seconds. It is comfort food in miniature, perfect for family brunches, potlucks, and last-minute dessert needs.
I discovered this technique during a morning when I needed to bring a dessert to a friend’s gathering and had only pantry staples on hand. The simplicity is the charm: crescent roll dough provides instant flakiness, the apple pie filling brings ready-made spiced fruit, and a small glaze ties everything together. The texture is a playful contrast between golden, slightly crisp edges and tender, sweet centers. This recipe is special because it transforms a few simple ingredients into something memorable, and it has become my go-to when I want a homemade treat without a long list of steps.
Why You'll Love This Recipe
- Ready in under 30 minutes from start to finish, making it ideal for quick desserts or spontaneous brunch plans.
- Uses two pantry staples, canned apple pie filling and store-bought crescent dough, so no need for advanced baking skills or chill time.
- Flexible and forgiving: swap fillings, adjust the cinnamon sugar, or make smaller or larger coils without losing structure.
- Perfect for feeding a crowd — one recipe yields eight generous danishes, and they travel well for potlucks.
- Light vanilla glaze adds sweetness without weighing the pastry down and can be omitted for a dairy-free finish.
- Minimal equipment required: a baking sheet and a pastry brush are all you need to achieve a bakery-style look at home.
My family reactions were immediate and enthusiastic the first time I made these. My partner compared them to a bakery buy, and my kids loved helping pinch the edges. Over the years I perfected the rolling and coiling technique so that each piece bakes evenly and holds a generous spoonful of filling without leaking.
Ingredients
- Crescent rolls: 2 (8 ounce) tubes of store-bought crescent roll dough (each tube contains 8 triangles). Look for a brand that separates cleanly along the perforations to make sealing easier. These provide the quick flaky layers without laminated dough.
- Apple pie filling: 20 ounce can. Choose a spiced variety if you like stronger cinnamon notes, or a low sugar option if you prefer less sweetness. Drain slightly and chop larger slices for a better texture in each danish pocket.
- Butter: 2 tablespoons salted butter, melted. Salted butter adds depth; if using unsalted, add a pinch of salt to the cinnamon sugar for balance.
- Cinnamon sugar: 3 tablespoons total (about 2 tablespoons granulated sugar mixed with 1 teaspoon ground cinnamon for the initial sprinkle, plus an extra pinch for topping). This layer caramelizes lightly in the oven and complements the apple filling.
- Glaze: 1/2 cup powdered sugar, 1 teaspoon vanilla extract, and 3 to 4 teaspoons milk. Adjust milk to reach a pourable consistency. Use dairy-free milk to keep the glaze non-dairy if needed.
Instructions
Preheat and prepare: Preheat the oven to 350 degrees F and line or lightly grease a baking sheet. Allow the crescent dough to come to cool room temperature for a few minutes so the triangles separate more easily and are less likely to tear when you seal the perforations. Form rectangles: Separate the dough into eight rectangles by joining two crescent triangles along their long edges. Press the sealed edge firmly to close perforations so the filling stays inside. Work gently so the dough remains layered for flakiness. Brush with butter and sugar: Brush each rectangle with melted butter using a pastry brush or the back of a spoon, ensuring an even coating. Sprinkle the cinnamon sugar mixture across the buttered surface to create a sweet base that will caramelize during baking. Roll and coil: Starting from the long side, roll each rectangle into a loose cylinder and pinch the seams to seal. Holding one end, coil the roll into a spiral, leaving a small well in the center to hold the apple filling. Spread the spirals out slightly on the baking sheet to allow room for expansion. Prepare filling and top: Open the can of apple pie filling and, with a knife, cut larger apple slices into smaller, bite-sized pieces. Spoon about 2 to 3 tablespoons of the chopped filling into the center well of each coil. Sprinkle a touch more cinnamon sugar on top for added caramelization. Bake until golden: Bake at 350 degrees F for 15 to 18 minutes until the danishes are golden brown on top and cooked through. Look for bubbling around the filling and a light, even color on the dough as visual cues. Rotate the pan halfway through baking if your oven has hot spots. Glaze and serve: While the danishes cool for 5 minutes, whisk together 1/2 cup powdered sugar, 1 teaspoon vanilla extract, and 3 to 4 teaspoons milk until smooth. Drizzle the glaze over warm danishes using a spoon or a small piping bag, then serve slightly warm.
You Must Know
- This makes eight danishes, approximately 175 calories per serving when glazed; actual values will vary by brand of crescent dough and apple filling used.
- Store cooled danishes in an airtight container at room temperature for up to 24 hours, or refrigerate for up to 3 days. Reheat briefly for best texture.
- Freezing before baking is not recommended as the filling may cause sogginess; baked danishes freeze well for up to 3 months when wrapped individually and reheated in a 325 degrees F oven for 8 minutes.
- Watch the edges during baking; if they brown too quickly, tent loosely with foil to finish baking without over-browning.
One of my favorite aspects of this approach is how forgiving it is. Family members have asked for these at birthday breakfasts, as an after-school treat, and even at weekend coffee dates. The method allows small hands to help coiling and filling, which turns baking into a shared activity that ends with everyone enjoying warm pastries together. Over time I learned that cutting the apples smaller creates more consistent filling distribution and prevents one danish from becoming overly wet.
Storage Tips
For short-term storage, place cooled danishes in a single layer in an airtight container at room temperature for up to 24 hours to preserve flakiness. For longer storage, refrigerate up to 3 days; the dough will firm and can be refreshed in a 325 degrees F oven for 6 to 8 minutes. To freeze, wrap each baked and cooled danish tightly in plastic wrap and place in a freezer bag for up to 3 months. Reheat frozen danishes from thawed state or directly from frozen at 350 degrees F for 10 to 12 minutes, checking frequently to avoid overbrowning. Avoid refrigerating glazed danishes for more than 48 hours as the glaze can become slightly sticky.
Ingredient Substitutions
If you prefer a lighter flavor, use an unsweetened apple filling and add 1 to 2 tablespoons of brown sugar or maple syrup to taste. Swap the canned apple filling for homemade stewed apples (about 2 cups) seasoned with 1/2 teaspoon cinnamon and 1 tablespoon lemon juice for fresher fruit flavor. For dairy-free or vegan versions, use a plant-based crescent dough if available and substitute melted coconut oil or vegan butter for the butter, and use a dairy-free milk for the glaze. To make the pastry gluten-free, use a certified gluten-free crescent dough alternative if your store carries it, but expect a slightly different texture.
Serving Suggestions
Serve these warm with a dusting of additional powdered sugar or a scoop of vanilla ice cream for dessert. For brunch, pair with strong coffee or a lightly spiced chai to complement the apple and cinnamon notes. Add a small side of fresh berries to brighten the plate visually and flavor-wise. Garnish with a light sprinkle of flaky sea salt on the glaze if you enjoy a touch of contrast between sweet and salty. These also make an excellent addition to holiday breakfast spreads and work well on buffet lines when kept under a heat lamp or in a warming tray.
Cultural Background
Filled pastries have a long history across many cultures, and this simple take draws on classic European fruit-filled pastries while using American pantry shortcuts. The use of canned pie filling and store-bought dough is a modern convenience adaptation that keeps the spirit of filled pastries alive for busy home cooks. In America, quick fruit danishes and turnovers often trace their inspiration to Scandinavian and Central European techniques where laminated dough and filled centers are traditional, but the shortcut versions reflect the American trait of pragmatic, flavorful simplicity.
Seasonal Adaptations
In autumn, swap the apple pie filling for pear and cranberry compote with a pinch of ginger for a fall-forward touch. In winter, try spiced pumpkin filling with a touch of nutmeg for a holiday twist. For spring and summer, use fresh peach or berry filling with lemon zest to lighten the flavor. You can also adapt the spice blend in the cinnamon sugar to include cardamom or allspice for seasonal flavor variation while keeping the same technique and bake time.
Meal Prep Tips
Prep the dough and filling in the morning and assemble the danishes just before baking for fresher results. If preparing for a gathering, assemble the spirals on a baking sheet, cover tightly with plastic wrap, and refrigerate for up to 4 hours; bring to room temperature for 10 minutes before baking. Make the glaze in advance and keep it in a small airtight container; add a splash of milk before using if it thickens. For bulk serving, bake multiple sheets and keep them warm in a 200 degrees F oven, loosely covered to prevent drying.
These small, buttery pastries are about more than convenience; they are a reminder that with a few smart shortcuts you can create moments worth remembering. Whether you are feeding friends, packing a school treat, or making a cozy breakfast, these danishes deliver comfort, flavor, and the satisfaction of homemade baking without the fuss.
Pro Tips
Seal crescent perforations thoroughly by pressing with your fingers to prevent filling leakage.
Chop larger apple slices from the can into smaller pieces so filling distributes evenly across danishes.
Brush with melted butter before sprinkling cinnamon sugar for better caramelization and color.
Bake in the center of the oven and rotate the sheet halfway for even browning.
For a glossy finish, brush with warmed apricot jam immediately after baking instead of glazing.
This nourishing easy apple danishes recipe is sure to be a staple in your kitchen. Enjoy every moist, high protein slice — it is perfect for breakfast or as a wholesome snack any time.
FAQs about Recipes
Can I assemble the danishes ahead of time?
Yes, you can prepare the danishes and refrigerate them covered for up to 4 hours before baking. Allow the dough to sit at room temperature for about 10 minutes before placing in the oven to ensure even baking.
What is the best way to reheat leftover danishes?
Reheat in a 325 degrees F oven for 6 to 8 minutes until warm and slightly crisp. Microwaving will make them soft and less flaky.
Tags
Easy Apple Danishes
This Easy Apple Danishes recipe makes perfectly juicy, tender, and flavorful steak every time! Serve with potatoes and a side salad for an unforgettable dinner in under 30 minutes.
Ingredients
Dough
Filling & Topping
Glaze
Instructions
Preheat and prepare
Preheat oven to 350 degrees F and prepare a baking sheet by spraying or lining with parchment. Allow crescent dough to come to cool room temperature briefly for easier handling.
Form rectangles
Join two crescent triangles along their long edges to make eight rectangles. Press perforations closed to prevent leaking and maintain layered dough for flakiness.
Brush and sprinkle
Brush each rectangle with 2 tablespoons melted butter. Sprinkle the cinnamon sugar evenly to create a sweet base that caramelizes during baking.
Roll and coil
Roll each rectangle from the long side into a loose cylinder and pinch the seam to seal. Coil each roll into a spiral and press slightly to create a well for filling.
Add filling and bake
Chop apple slices from the can and spoon 2 to 3 tablespoons into each center. Sprinkle with a bit more cinnamon sugar and bake at 350 degrees F for 15 to 18 minutes until golden.
Glaze and serve
Mix 1/2 cup powdered sugar, 1 teaspoon vanilla, and 3 to 4 teaspoons milk until smooth. Drizzle over warm danishes and serve slightly warm.
Last Step: Please leave a rating and comment letting us know how you liked this recipe! This helps our business to thrive and continue providing free, high-quality recipes for you.
Nutrition
Did You Make This?
Leave a comment & rating below or tag
@silksavor on social media!
Categories:
You might also like...

Parmesan Herb Crusted Salmon
Tender baked salmon crowned with a garlicky Parmesan herb crust, bright lemon, and buttery crunch. Simple to make, stunning to serve, and irresistibly flavorful.

Caramel Apple Cheesecake Bars
Buttery graham crust, silky cheesecake, and cinnamon-kissed apples under a crunchy crumb, finished with glossy caramel. A fall crowd-pleaser you will crave.

Homemade Green Bean Casserole
Tender green beans in silky mushroom cream, crowned with crispy onions. A comforting holiday side made entirely from scratch that always disappears fast.
Did You Make This?
Leave a comment & rating below or tag @silksavor on social media!
Rate This Recipe
Share This Recipe
Enjoyed this recipe? Share it with friends and family, and don't forget to leave a review!
Comments (1)
This recipe looks amazing! Can't wait to try it.
Comments are stored locally in your browser. Server comments are displayed alongside your local comments.

Hi, I'm Julia!
What's Popular

30-Minute Meals!
Join to receive our email series which contains a round-up of some of our quick and easy family favorite recipes.