
>>

Crispy, golden zucchini fries that are low-carb, gluten-free, and irresistibly cheesy—perfect for snacking or as a side, inspired by fresh zucchini from Mom’s garden.

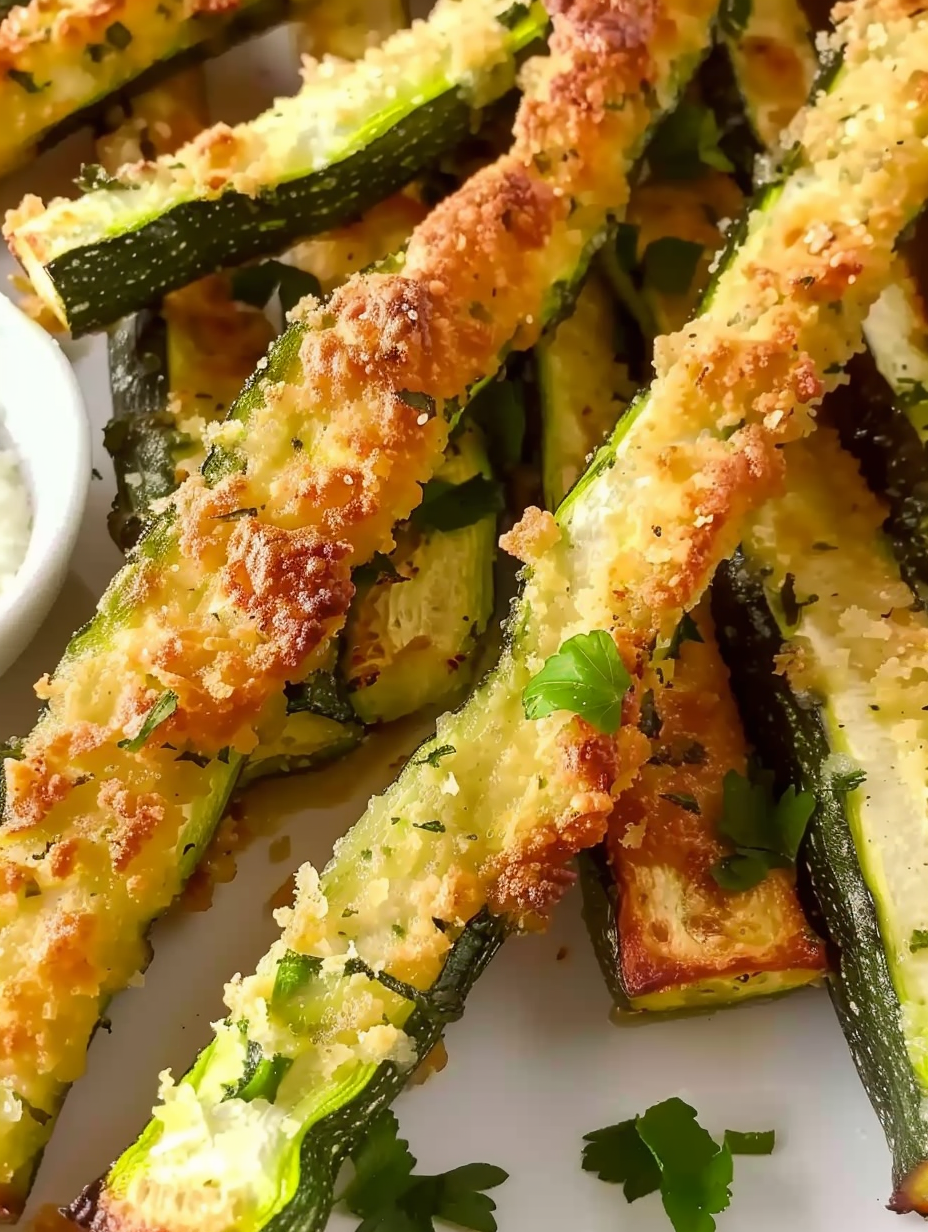
This dish of crispy zucchini fries came into my kitchen the way many of my favorite things do: from my mom’s overflowing garden and a late-afternoon craving for something crunchy and comforting without the heaviness of breadcrumbs. I first made these on a humid summer evening when the zucchini bounty needed to be used quickly. The combination of freshly grated Parmesan and a whisper of garlic transformed humble green spears into something everyone within sniffing distance wanted to try. They brown beautifully, snapping at the edges while remaining tender inside—an ideal balance for a guilt-free snack.
What makes these zucchini fries special is their simplicity: minimal ingredients, short hands-on time, and a technique that guarantees golden edges without deep-frying. They are naturally gluten-free and low in net carbs, so I often make them for casual gatherings where some guests are avoiding gluten or trimming carbs. The crunch is driven by the finely grated cheese crust, which melts and crisps into a savory shell. I still remember my teenage nephew sneaking a whole handful before dinner one night and declaring them "better than real fries." That’s when I knew this was a keeper.
From my experience, the family reaction is consistently delighted—these fries disappear fast. I often make a double batch if I’m hosting because they travel well from oven to table. Over the years I've learned little tweaks—like drying the zucchini thoroughly and using finely grated Parmesan—that make a big difference in crispiness and appearance.

My favorite part of this dish is how quickly it disappears at gatherings—the crunchy edges and the cheesy aroma draw people in. One memorable July 4th, a tray arrived at the table and my usually picky aunt loved them so much she asked for the "secret" which was simply fresh cheese and a hot oven. It’s a reminder that simple, thoughtful techniques beat complicated tricks every time.
To store, let the fries cool completely on a wire rack to avoid trapping steam, then transfer them to an airtight container lined with paper towels to absorb residual moisture. Refrigerate for up to 3 days. Reheat on a baking sheet at 375°F for about 6–8 minutes or until edges regain crispness; a quick pass in a hot skillet over medium-high heat for 2–3 minutes also works. Avoid microwaving for reheating as it makes the coating soft and unappealing. If freezing is necessary, flash-freeze on a tray for 1 hour, then transfer to a freezer bag and use within one month—expect some loss of crispness upon reheating.
If you’re out of Parmesan, use Pecorino Romano for a saltier, sharper profile—reduce added salt by half. For a dairy-free version, try a finely ground almond or macadamia crust mixed with nutritional yeast for cheesiness; note the texture will be slightly different and may brown faster. If eggs are a concern, use a flax egg (1 tablespoon ground flaxseed + 3 tablespoons water, chilled) but press the coating firmly as adhesion is weaker. To increase fiber and bulk, sprinkle a teaspoon of ground psyllium husk into the cheese mix; it will help bind and add structure without extra carbs.
These fries shine as an appetizer or side: pair them with a tangy sugar-free marinara, a garlic-herb yogurt dip, or a spicy aioli for contrast. For a light meal, serve alongside a grilled protein such as lemon-herb chicken or a piece of pan-seared salmon and a crisp green salad. Garnish with fresh parsley, lemon zest, or extra grated cheese. They’re also excellent on a buffet with skewers and small dipping bowls so guests can customize their flavors.
While the idea of frying or baking vegetable sticks is universal, these cheese-crusted spears draw inspiration from Italian traditions of using cheese as a coating and from modern low-carb approaches that replace breadcrumbs with nuts, cheese, or blends. Zucchini itself is a relatively recent crop in some kitchens, adopted widely in American home cooking during the mid-20th century as gardeners appreciated its reliability and yield. This particular preparation riffs on the classic comfort of fried snacks but adapts it for contemporary dietary preferences.
In summer, use zucchini straight from the garden for the sweetest flavor. For winter, substitute with summer squash of similar size or try parsnip spears coated the same way for a heartier, root-vegetable option. To make these holiday-ready, add 1/4 teaspoon of smoked paprika and a tablespoon of chopped fresh rosemary to the cheese mix for deeper flavor. For cooler months, serve with a warm roasted red pepper dip to complement the golden exterior.
For make-ahead convenience, assemble the coated spears on a parchment-lined sheet, cover tightly, and refrigerate for up to 6 hours before baking. This is handy if you want to prep in the morning and bake just before guests arrive. If prepping for a week of lunches, bake, cool, and store in single-serving containers with paper towels; reheat briefly in a toaster oven for a near-fresh experience. Keep dipping sauces separate in small airtight jars.
These zucchini fries are a celebration of simple techniques and fresh ingredients. They’re approachable for cooks of any level and adaptable to many occasions. Give them a try this weekend—bring out a plate, share with friends, and enjoy the little victory of turning garden vegetables into something unexpectedly indulgent.
Dry the zucchini spears thoroughly with paper towels before coating to prevent sogginess and promote browning.
Use freshly grated Parmesan from a block—it melts and crisps better than pre-grated varieties.
Press the cheese mixture firmly onto each spear to form an even crust that stays in place during baking.
Broil briefly (1–2 minutes) at the end while watching closely for extra golden color without burning.
Reheat leftovers in a toaster oven or skillet rather than a microwave to regain crispness.
This nourishing keto gluten-free zucchini fries recipe is sure to be a staple in your kitchen. Enjoy every moist, high protein slice — it is perfect for breakfast or as a wholesome snack any time.
Bake on a rimmed sheet at 400°F for about 20 minutes; broil 1–2 minutes if you want extra color.
Yes—pat them very dry and use finely grated Parmesan. Almond meal can replace cheese for dairy-free, but texture differs.
This Keto Gluten-Free Zucchini Fries recipe makes perfectly juicy, tender, and flavorful steak every time! Serve with potatoes and a side salad for an unforgettable dinner in under 30 minutes.
Preheat the oven to 400°F and line a rimmed baking sheet with parchment paper. Ensure oven racks are centered for even baking.
Rinse and trim zucchini ends. Cut each zucchini lengthwise into quarters and then into 2–3 inch spears about 1/2-inch thick. Lightly season with a pinch of salt and pat dry to remove surface moisture.
Whisk the large egg in a shallow bowl. In another bowl combine 3/4 cup freshly grated Parmesan, 1/2 teaspoon garlic powder, and 1/2 teaspoon red pepper flakes if using. Finely grated cheese adheres and crisps best.
Dip each dried spear into the beaten egg, allow excess to drip off, then roll in the cheese mixture. Press the mixture onto the surface to form an even crust and place on the prepared sheet with spacing between pieces.
Bake in the preheated oven for approximately 20 minutes until the crust is golden brown and firm. For additional browning, broil 1–2 minutes while watching closely to prevent burning.
Remove from oven and serve immediately with your favorite dipping sauce. These are crispiest when eaten hot from the oven.
Last Step: Please leave a rating and comment letting us know how you liked this recipe! This helps our business to thrive and continue providing free, high-quality recipes for you.
Leave a comment & rating below or tag
@silksavor on social media!

Tender baked salmon crowned with a garlicky Parmesan herb crust, bright lemon, and buttery crunch. Simple to make, stunning to serve, and irresistibly flavorful.

Buttery graham crust, silky cheesecake, and cinnamon-kissed apples under a crunchy crumb, finished with glossy caramel. A fall crowd-pleaser you will crave.

Tender green beans in silky mushroom cream, crowned with crispy onions. A comforting holiday side made entirely from scratch that always disappears fast.
Leave a comment & rating below or tag @silksavor on social media!
Enjoyed this recipe? Share it with friends and family, and don't forget to leave a review!
This recipe looks amazing! Can't wait to try it.
Comments are stored locally in your browser. Server comments are displayed alongside your local comments.

Join to receive our email series which contains a round-up of some of our quick and easy family favorite recipes.
