
Mini Cherry Cheesecakes

Creamy, bite-sized cherry cheesecakes with a crunchy graham crust and sweet cherry topping — perfect for parties and make-ahead treats.
Why You'll Love This Recipe
- Perfect bite size: makes 18 individual portions that are easy to serve and portion-controlled for parties and potlucks.
- Simple pantry ingredients: uses graham cracker crumbs, cream cheese, eggs, and canned cherry pie filling — all easy to find year-round.
- Fast hands-on time: about 15 minutes of active prep and then 25 minutes in the oven, so you can focus on other dishes.
- Make-ahead friendly: chill fully for at least two hours or refrigerate overnight to develop flavor and texture.
- Child-friendly and crowd-pleasing: the sweet-tart cherries and creamy filling appeal across generations, ideal for gatherings.
- Reliable technique: foil-lined wrappers peel cleanly and the small format bakes evenly without water baths or complicated steps.
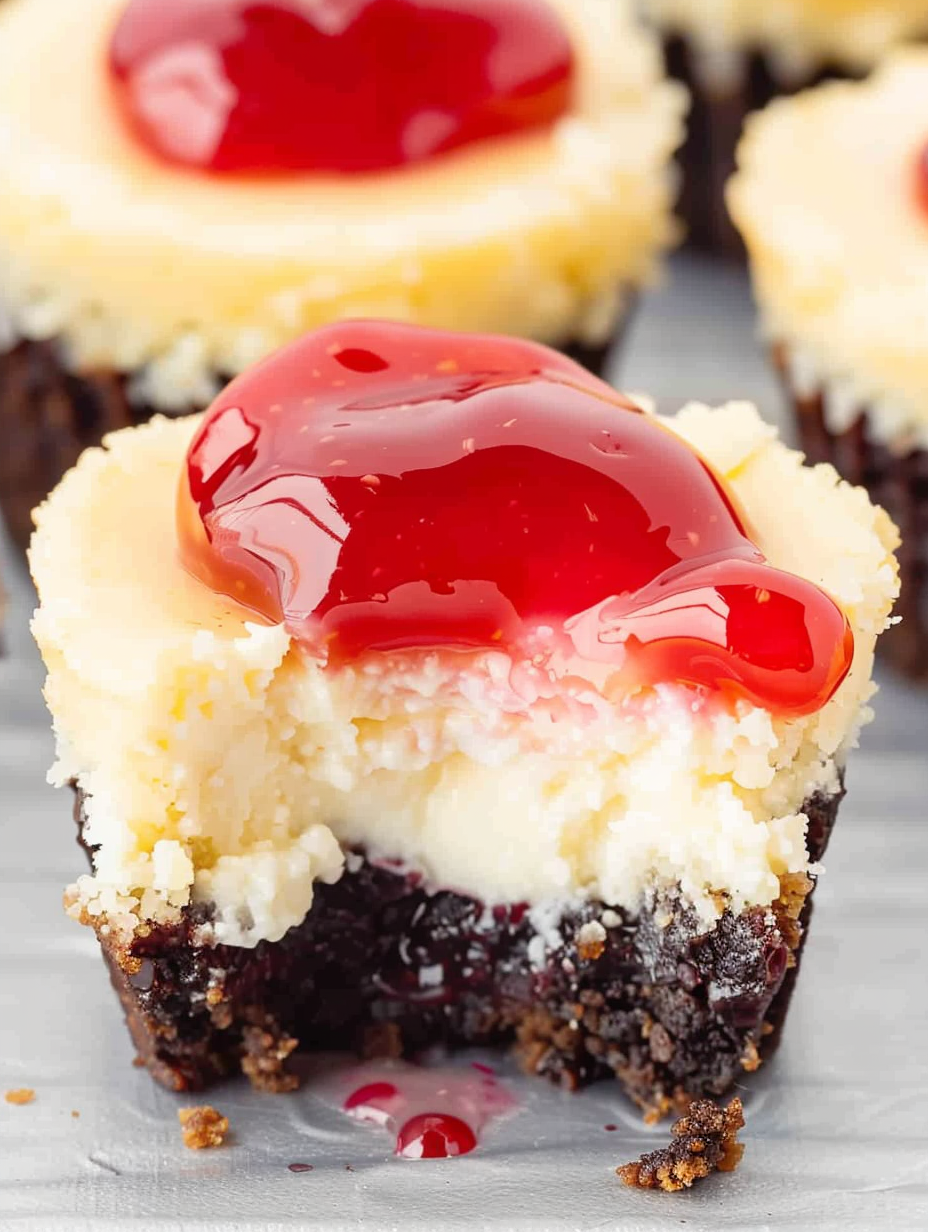
I started making these for summer block parties and quickly learned the secret that makes them disappear: small size plus bold cherry topping equals instant nostalgia. Family members began requesting these for birthdays and school events. After a few tries I refined the bake time so the centers are just slightly jiggly when removed; that little wobble means tender, not overbaked. Guests often tell me they taste like a mini slice of homemade cherry pie with the richness of a classic cheesecake, which is exactly the effect I aim for.
Ingredients
- Unsalted butter: Use 1/2 cup melted. I prefer salted European-style butter for flavor, but unsalted allows you to control the salt. Melt and cool slightly before combining so it blends smoothly with the crumbs.
- Graham cracker crumbs: 1 1/2 cups. Purchase pre-crushed crumbs for convenience or pulse whole crackers in a food processor for a fresher flavor. The crumbs form a crisp, buttery base that supports the filling.
- Cream cheese: 16 ounces, softened. Full-fat blocks yield the creamiest texture. Leave at room temperature for 30 to 45 minutes so the batter is lump-free when beaten.
- White sugar: 1 cup. Granulated sugar balances the tang of cream cheese and the tartness from the cherries.
- Eggs: 2 large, at room temperature. Room temperature eggs incorporate more evenly so the filling is smooth and sets without curdling.
- Sour cream: 1/3 cup. Adds tang and a silkier mouthfeel; plain full-fat sour cream is best for stability and flavor.
- Vanilla extract: 1 teaspoon. Use a good-quality pure vanilla for depth; artificial extracts will work but lack nuance.
- All-purpose flour: 1 tablespoon. A small amount stabilizes the filling so it holds shape in each mini cup without affecting creaminess.
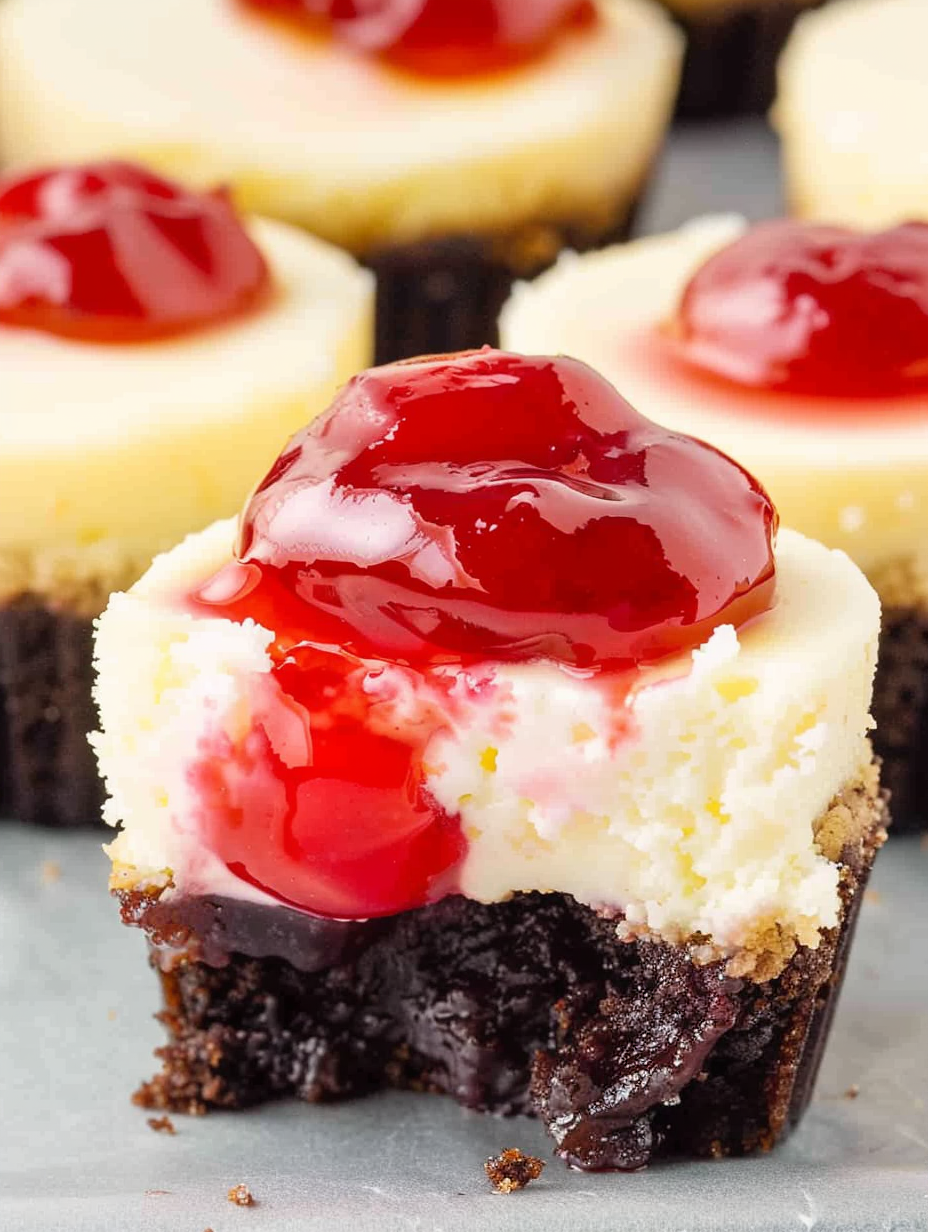
- Cherry pie filling: 1 can. Choose a standard 21-ounce can or similar; drain slightly if your brand is syrupy to avoid soggy tops.
Instructions
Preheat and prepare pans: Preheat the oven to 350°F. Line a 18-cup muffin tin with foil-lined cupcake wrappers; the foil lining makes the cups easier to peel away when serving. Ensure the wrappers sit snugly so the crust can be pressed evenly. Make the crust: In a medium bowl combine 1/2 cup melted butter with 1 1/2 cups graham cracker crumbs until evenly moistened. Press about 1 tablespoon of the mixture into the bottom of each lined cup, using the bottom of a spoon or a small measuring cup to compact it. A firm press prevents the crust from crumbling when served. Beat the cream cheese and sugar: In a large bowl, beat 16 ounces softened cream cheese with 1 cup sugar until smooth and free of lumps, scraping down the sides often. Use a stand mixer on low or an electric hand mixer; the goal is a silky base, not aeration. Add eggs and dairy: Beat in the eggs one at a time until incorporated, again scraping the bowl. Add 1/3 cup sour cream, 1 teaspoon vanilla, and 1 tablespoon flour, and beat just until combined. Overmixing will incorporate too much air and can cause cracks while baking. Fill the cups: Spoon the filling into each crust-lined cup, filling to about 1/2 inch from the top. They rise slightly during baking, so leave that small space to avoid overflow. Bake and check for doneness: Bake 20 to 25 minutes at 350°F. They are done when the centers remain just slightly jiggly — the edges will be set and lightly golden. Overbaking yields a drier texture, so err on the shorter side and test a central cup. Cool and chill: Remove from oven and let cool on the counter 20 minutes to settle, then transfer to the refrigerator and chill at least two hours or overnight. Chill time firms the filling and enhances flavor. Top and serve: Before serving, top each mini cheesecake with about 1 tablespoon of cherry pie filling. Serve cold; the contrast of chilled filling and bright cherry topping is best when fully chilled.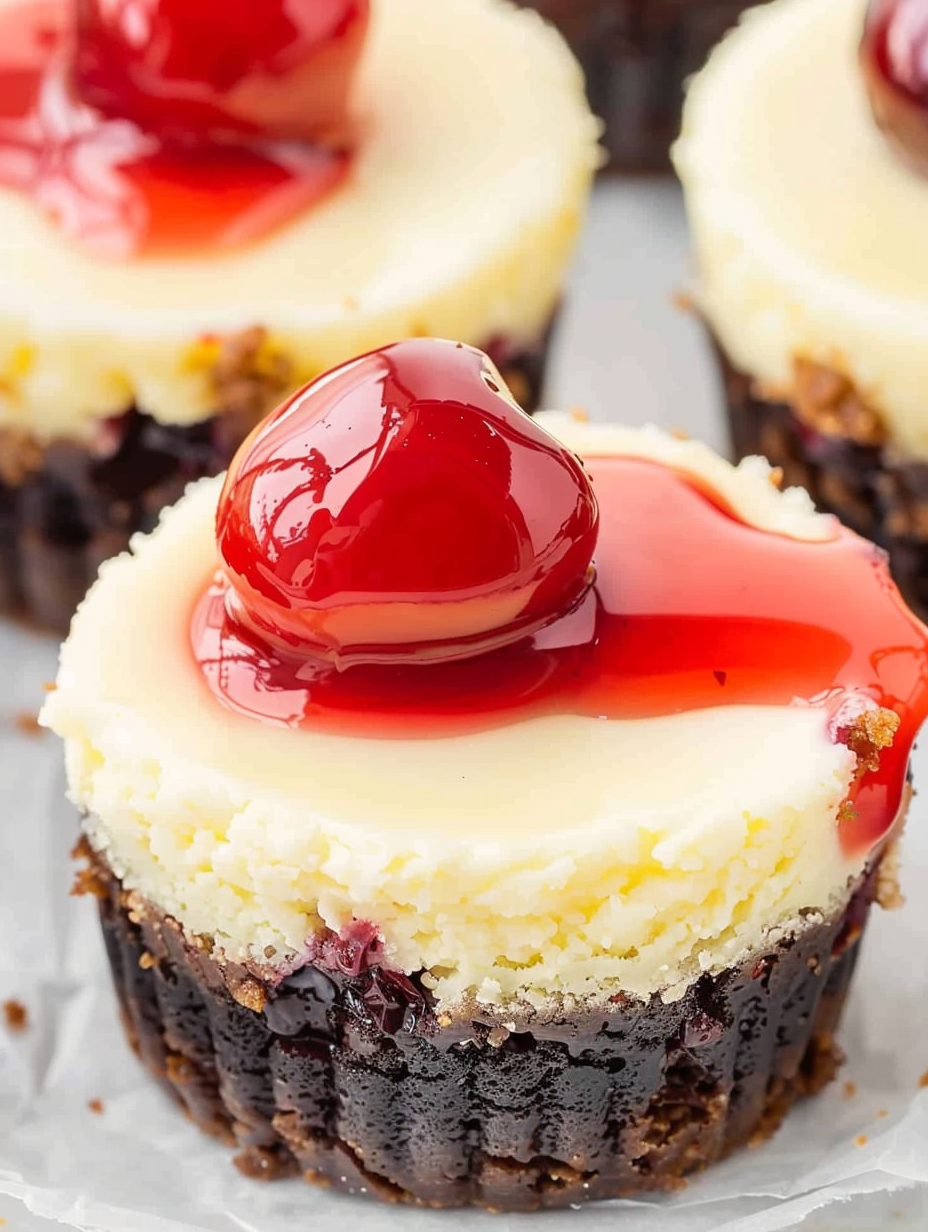
You Must Know
- These keep well refrigerated for up to 4 days and can be frozen for about 3 months if stored in an airtight container with parchment between layers.
- Use foil-lined wrappers to peel away cleanly and avoid soggy edges; avoid paper-only liners for best release.
- Centers should be slightly jiggly at removal; residual heat continues to set the filling as they cool.
- Oven temperatures vary; if your oven runs hot reduce time by a few minutes and check early to prevent cracks.
My favorite aspect is how quickly these transform from pantry staples into a dessert that looks homemade and elegant. At a recent family brunch, a neighbor noted they looked like the kind of dessert sold at bakeries, which made me laugh because the recipe is so approachable. The cherry topping brings a pop of color that makes presentation effortless and festive.
Storage Tips
Store chilled in an airtight container layered with parchment or wax paper between layers to prevent sticking. In the refrigerator they remain best for up to four days; beyond that the crust begins to soften from the moisture of the filling. For longer storage, freeze in a single layer until firm, then stack with parchment separators in a freezer-safe container. Thaw in the refrigerator overnight, and add the cherry topping just before serving to keep the fruit vibrant and the syrup from soaking into the crust.
Ingredient Substitutions
If you need to adapt ingredients, try crushed digestive biscuits or vanilla wafers in place of graham crumbs for a slightly different flavor profile; use the same volume measurement. For a lighter texture, replace half the sour cream with plain Greek yogurt — expect a tangier finish. If dairy-free is required, use a dairy-free cream cheese alternative and coconut cream; texture will be slightly looser and chilling time may need to increase. For a lower-sugar option, swap granulated sugar for a granulated sugar substitute measured cup-for-cup, but be mindful that sweetness and mouthfeel will change slightly.
Serving Suggestions
Serve chilled on a dessert platter with a small spoon. Garnish with a few fresh cherries, a sprinkle of finely chopped toasted almonds, or a small mint leaf to add contrast. They pair beautifully with coffee, a light dessert wine, or sparkling water with lemon. For holiday platters, arrange them on a tiered server and add seasonal garnishes like orange zest or toasted coconut flakes for a festive touch.
Cultural Background
Mini cheesecakes are an American adaptation of classic European cheesecakes that emphasizes portability and portion control. The graham cracker crust is a distinctly American innovation, popularized in the early 20th century when graham crackers became a pantry staple. Topping with canned pie filling is a pragmatic mid-century convenience that became a nostalgic hallmark of home baking in the United States, especially when fresh fruit was not in season.
Seasonal Adaptations
In summer, swap cherry pie filling for fresh macerated berries or a summer peach compote. In the fall try a spiced apple compote with a pinch of cinnamon and nutmeg. For winter holidays use cranberry-orange topping or a salted caramel drizzle with chopped pecans. Adjust toppings while keeping the same base technique to tailor the dessert to seasonal flavors and occasions.
Meal Prep Tips
Make the crusts the day before and store them uncovered in the refrigerator so they remain crisp. Prepare the filling, cover, and refrigerate; fill the cups and bake the next day to save active time before guests arrive. If transporting, pack them chilled in a rigid container on a bed of ice packs. Always top with cherry filling only at serving time to maintain the best texture and visual appeal.
These mini cherry cheesecakes are small in size but big on joy. Whether you make them for a crowd or a quiet treat, they invite customization, travel well, and deliver consistent results. Try the little tips in this post and make the recipe your own — then pass it along to friends the way it was passed to me.
Pro Tips
Use foil-lined cupcake wrappers to make peeling clean and easy.
Room-temperature cream cheese and eggs incorporate more smoothly and reduce lumps.
Do not overbeat the filling to avoid incorporating too much air which can cause cracking.
Check for a slight jiggle at the center to avoid overbaking and maintain creamy texture.
This nourishing mini cherry cheesecakes recipe is sure to be a staple in your kitchen. Enjoy every moist, high protein slice — it is perfect for breakfast or as a wholesome snack any time.
FAQs about Recipes
Can I serve these the same day?
Yes. Chill uncovered at room temperature for about 20 minutes after baking, then refrigerate for at least two hours or overnight for best texture.
How do I freeze mini cheesecakes?
Freeze fully chilled cheesecakes in a single layer until firm, then stack with parchment between layers in an airtight container for up to 3 months.
Tags
Mini Cherry Cheesecakes
This Mini Cherry Cheesecakes recipe makes perfectly juicy, tender, and flavorful steak every time! Serve with potatoes and a side salad for an unforgettable dinner in under 30 minutes.
Ingredients
Crust
Filling
Topping
Instructions
Preheat and prepare pans
Preheat oven to 350°F. Line an 18-cup muffin tin with foil-lined cupcake wrappers to ensure easy removal and neat edges.
Make the crust
Combine 1/2 cup melted butter with 1 1/2 cups graham cracker crumbs and press approximately 1 tablespoon into the bottom of each liner to form a compact crust.
Prepare the filling
Beat 16 ounces softened cream cheese with 1 cup sugar until smooth. Add eggs one at a time, then mix in 1/3 cup sour cream, 1 teaspoon vanilla, and 1 tablespoon flour until just combined.
Fill the cups
Spoon the batter into each crust-lined cup, filling to about 1/2 inch from the top to allow for slight rise during baking.
Bake
Bake at 350°F for 20 to 25 minutes. They are done when the edges are set and the centers are slightly jiggly. Remove from oven and cool 20 minutes before refrigerating.
Chill and top
Chill in the refrigerator for at least two hours. Top each mini cheesecake with about 1 tablespoon of cherry pie filling just before serving.
Last Step: Please leave a rating and comment letting us know how you liked this recipe! This helps our business to thrive and continue providing free, high-quality recipes for you.
Nutrition
Did You Make This?
Leave a comment & rating below or tag
@silksavor on social media!
Categories:
You might also like...

Parmesan Herb Crusted Salmon
Tender baked salmon crowned with a garlicky Parmesan herb crust, bright lemon, and buttery crunch. Simple to make, stunning to serve, and irresistibly flavorful.

Caramel Apple Cheesecake Bars
Buttery graham crust, silky cheesecake, and cinnamon-kissed apples under a crunchy crumb, finished with glossy caramel. A fall crowd-pleaser you will crave.

Homemade Green Bean Casserole
Tender green beans in silky mushroom cream, crowned with crispy onions. A comforting holiday side made entirely from scratch that always disappears fast.
Did You Make This?
Leave a comment & rating below or tag @silksavor on social media!
Rate This Recipe
Share This Recipe
Enjoyed this recipe? Share it with friends and family, and don't forget to leave a review!
Comments (1)
This recipe looks amazing! Can't wait to try it.
Comments are stored locally in your browser. Server comments are displayed alongside your local comments.

Hi, I'm Julia!
What's Popular

30-Minute Meals!
Join to receive our email series which contains a round-up of some of our quick and easy family favorite recipes.